
“Yoga is so overrated,†said no one who has ever tried it. That’s because anyone who has embraced a consistent yoga practice knows firsthand the countless benefits that come with all those stretches, mindful breaths, and maybe a few groans here and there. Think about it—there’s a reason yoga has stood the test of time and remains a standalone practice, despite the rise and fall of countless other fitness and mental health trends.
Believe it or not, there are plenty of cyclists out there who somehow dismiss yoga and think that just riding their bikes is enough to keep them fit and limber. While cycling is undeniably an excellent way to get cardio and burn fat, it alone won’t give you everything you need, especially if you’re looking to improve flexibility.
The truth is, yoga might be uncomfortable at first, but it’s the TLC your body has been silently pleading for. Adding yoga to your cycling routine could be the missing piece that brings balance to your fitness journey, like finding the yin to your yang.
### Why Do I Need to Do Yoga?
Many athletes, especially cyclists, dismiss yoga as irrelevant to their lifestyle. Here are some common misconceptions:
- "I don't need yoga because a quick stretch before and after my ride is all I need."
- "Cycling gives me all the physical activity I need without yoga."
- "I barely have time for riding, so yoga isn’t worth my time."
- "Yoga is for women; it’s not for guys."
The reality is that many cyclists endure discomfort and pain due to the aggressive riding posture, which focuses on developing back and leg muscles but leaves the abs relatively weak. Weak abs can lead to quicker fatigue, affecting your riding posture and causing you to unintentionally put extra strain on your shoulders and wrists. In the long term, this can lead to pain and discomfort. **THIS IS WHY YOU NEED YOGA.**
Not only does yoga help maintain better riding posture, but it also increases overall flexibility. Cyclists spend most of their time bent over their handlebars, leading to tight hip flexors and lower back pain—even with proper riding form. Yoga helps relieve these tensions, especially poses targeting the hips and lower back, balancing muscle strength and preventing injuries. A little yoga every day can do wonders for reducing aches and pains.
One surprising benefit of yoga is that it trains you to focus on deep, controlled breathing. This kind of intentional breathing improves your aerobic capacity and pays off during rides, helping you maintain better control over your breathing. Over time, you can override the natural inhale-exhale pattern that cyclists typically sync with their pedal strokes, leading to more efficient and controlled breathing, especially during sprints, climbs, and accelerations.
### Before You Begin
Before you dive into yoga, there are a few important questions to ask yourself:
1. **What is my current stretching routine?**
If you’re new to stretching, remember that increasing flexibility takes time and consistency. If you’ve practiced yoga before, fine-tune your routine to meet your body’s needs. For beginners, opt for modified versions of poses.
2. **Have I ever done yoga?**
If you expect to master a perfect split within just two months of daily practice, you’re setting unrealistic expectations. Many experienced yogis practice for years to achieve that level of flexibility. Start with beginner-level poses and avoid pushing yourself too hard, especially if you’re inflexible. Unrealistic goals can lead to injury.
3. **How often do I ride?**
The more frequently you ride, the more likely you are to need yoga. Cyclists who ride regularly should consider incorporating yoga into their routine.
4. **What kind of riding do I do?**
Whether you’re cruising leisurely along a boardwalk or tackling intense mountain biking trails, your yoga needs will depend on your riding style. Aggressive or frequent cyclists will likely benefit more from yoga to counteract the physical toll of their activities.
5. **Am I currently experiencing discomfort related to riding?**
Common complaints among cyclists include tight hips and lower back pain. Pay attention to your body and seek medical advice if you suspect issues beyond typical tightness. Always consult with your doctor before starting any new exercise routine.
Once you’ve honestly assessed your situation, it’s time to get started.
---
### Getting Started
If this is your first time doing yoga or you haven’t practiced in a while, it’s crucial to listen to your body. Being in good cardiovascular shape doesn’t mean you’re flexible. Be honest with yourself about your current flexibility to avoid injury. Some poses might feel good, while others might feel uncomfortable. Mild discomfort is normal, but if you experience actual pain, stop immediately—it’s never a good sign.
As with any fitness routine, consult with your doctor to rule out any health concerns. Ignoring this step could lead to unnecessary injuries that sideline you for days or even weeks.

### Yoga and Riding
Below are some yoga poses that are great for cyclists. These are static stretches, meaning each pose should be held for 10 to 60 seconds. With consistent practice, you can extend the hold time to as long as five minutes. The best time to practice yoga is either before or after a workout, or on a light recovery day.
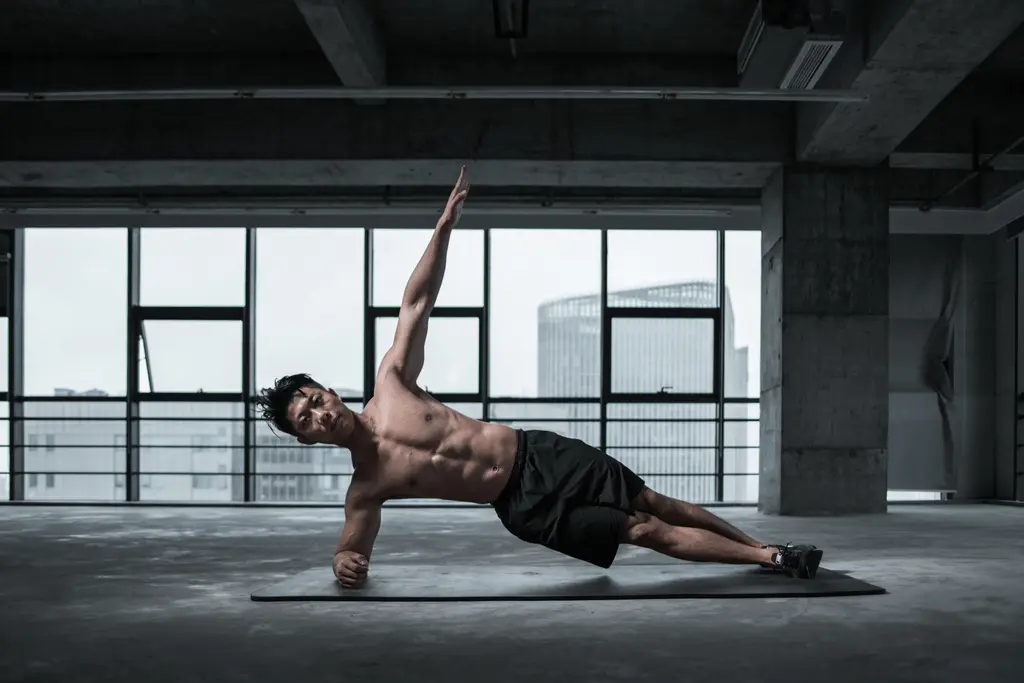
#### Standard Plank Pose
The plank is one of the most recognizable yoga positions. It’s used by everyone from bodybuilders to Pilates enthusiasts because it’s such a great move. The plank strengthens your entire body, but it’s especially effective for your core.
**Target Area:** Full body, especially abs, shoulders, and triceps.
To get into a plank position, place your hands under your shoulders and extend your legs behind you, similar to a push-up. Ground your toes into the mat, squeeze your glutes, and keep your body tight like a plank. Your gaze should be about a foot in front of your hands, with your nose pointing toward the floor and your neck parallel to the ceiling. Hold for 15 to 30 seconds, then relax. Aim for three sets. Don’t forget to breathe!
**To Avoid Injury:** Be mindful of your form. Avoid hyperextending or locking your knees. Keep your body tight to prevent your lower back from sagging. Your hips should never be higher than your shoulders. If the standard plank is too challenging, try the forearm plank instead. Place your forearms on the mat, elbows aligned with your shoulders, and your arms parallel to your body.
[Watch Plank Tutorial](https://www.youtube.com/embed/ASdvN_XEl_c)
#### Sphinx Plank Pose
The sphinx pose is another easy-to-learn move that’s great for relieving lower back discomfort caused by the hunched-over riding position. It reverses the posture you assume while riding, restoring the natural curve of your spine and reducing stiffness in your lower back and shoulders.
**Target Area:** Lower back, chest, shoulders.
Lie on your stomach, pressing your forearms into the mat. Gently press upward so your upper back lifts, while keeping your pelvis grounded. Elbows should hug your sides, and your shoulders should be pulled down and back. For a deeper stretch, rotate your thighs inward slightly. Hold for 30 to 60 seconds.
**To Avoid Injury:** Be cautious of hyperextending your back. Focus on stretching and strengthening, not how high you can lift. Keep your legs hip-width or wider apart to maintain a strong core. Listen to your body and respect its limits.
[Watch Sphinx Tutorial](https://www.youtube.com/embed/IzEjLbkeBA8)
#### Head-to-Knee Forward Bend Pose
This pose might look simple, but it’s incredibly effective for relieving stress in the lower body.
**Target Area:** Hamstrings, hip flexors, lower back.
Sit on your mat with both legs extended. Bend your left knee and place your left foot against your inner right thigh. Fold forward over your right leg, reaching toward your thigh and foot. If you can’t reach your foot, grab your ankle or use a strap. Hold for 30 to 60 seconds, then switch legs.
**To Avoid Injury:** Avoid hyperextending your knees and ensure your bent leg stays stable.
[Watch Head-to-Knee Forward Bend Tutorial](https://www.youtube.com/embed/GNFy1OocLKo)
#### Traditional Pigeon Pose (Traditional or Reclined)
Many yogis love the pigeon pose, despite its initial discomfort, because it’s incredibly effective at opening the hips.
**Target Area:** Hip flexors, glutes, groin, hamstrings.
Start on all fours, moving your right knee toward your right hand and angling your leg like a clock hand pointing to two. Slide your left leg back as far as possible. If you’re flexible enough, rest on your forearms instead of your hands. Switch legs and repeat.
**To Avoid Injury:** Keep your hips square to the floor and rotate your bent leg externally and your straight leg internally. If the traditional pose is too intense, try the reclined version by lying on your back, crossing your right ankle over your left knee, and pressing your right knee away. For a deeper stretch, lift your left leg toward your chest.
[Watch Pigeon Pose Tutorial](https://www.youtube.com/embed/2msg4jdu0vk)
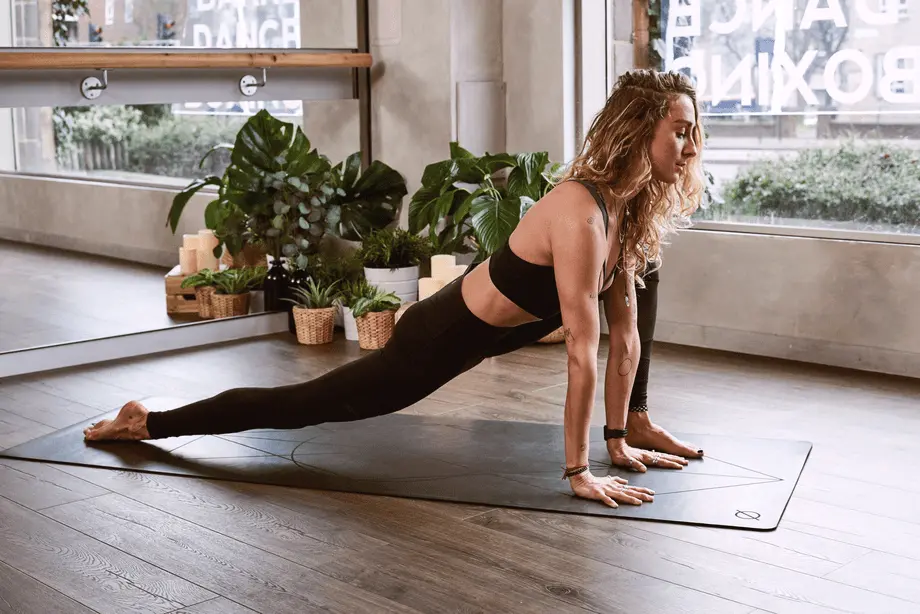
#### Runner’s Lunge Pose
This pose effectively opens the hips and stretches tense legs, which are common issues for cyclists.
**Target Area:** Hip flexors, groin, legs.
Get into the runner’s lunge from plank position. Step forward with your right leg, placing it outside your hands, and lower your left knee to the ground. For a deeper stretch, lower onto your forearms. Hold for 30 to 60 seconds.
**To Avoid Injury:** Avoid using your leg muscles to hold up your hips. Release your hips and let gravity deepen the stretch.
[Watch Runner’s Lunge Tutorial](https://www.youtube.com/embed/OfJl_jhJcWw)
#### Butterfly Pose
This pose might feel aggressive at first, but it’s great for loosening up your hips and thighs.
**Target Area:** Inner thighs, groin, hips/hip flexors.
Sit with your chest lifted and back long. Exhale and bend your knees, bringing the soles of your feet together. Let gravity pull your knees down naturally. Hold for 30 to 60 seconds. For a deeper stretch, fold forward over your knees.
**To Avoid Injury:** Be cautious not to push beyond your limits. Stop if you feel pain.
[Watch Butterfly Pose Tutorial](https://www.youtube.com/embed/2_495bJNZiU)
### Tips
- Whenever possible, start with beginner-level poses. It’s better to ease into it than to injure yourself by pushing too hard.
- Hold each pose for 15 to 30 seconds initially, gradually increasing as you progress.
- Use props like bolsters, blocks, or rolled-up towels to help deepen stretches safely.
---
### The Verdict
Cycling offers numerous health benefits, but to maximize your rides, you need to incorporate yoga into your routine. With thousands of years of history, yoga has proven to enhance breath control, flexibility, muscle awareness, and postural health. It connects the mind and body through conscious breathing, aids recovery, and just makes you feel better. The real question shouldn’t be why you should do yoga, but why you aren’t doing it yet.
[Get America's Best Bicycle Insurance](#)
The Cork Yoga Block is a great aid for both yoga beginner and those who need extra help perfecting diffcult yoga poses and meditation practices.Gaiam cork block is large enough to sit on comfortably.Made of natural cork,which is soft,non-stick and scratch-proof.The material is eco-friendly and non toxic.


Cork Yoga Block,Cork Block,Gaiam Cork Block,Cork Yoga Brick
Jiangsu Real Sporting Goods Limited Company , https://www1.ruiousporting.com